Up until now, filming on location has meant using a long extension cord to connect my lapel mic directly to the camera and vaguely wondering if I could justify the expense of getting a radio mic. This does mean I am severely restricted in how far away I can position the camera and what movements I can make.
But then I had one of those forehead-slapping why-didn’t-I-think-of-that-before revelations: I have a digital sound recorder. I can plug the mic into that, and (as long as I am wearing relatively loose-fitting trousers) put it in my pocket.
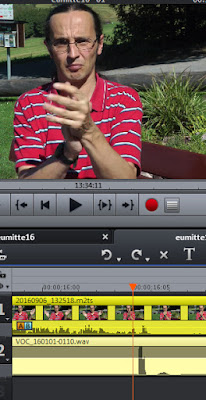
 The only real downside to that is that you end up with separate sound files that you then have to synchronize with the video. But there’s a very simply remedy to that: before you start talking, clap your hands.
In Hollywood, they use clapperboards for the same purpose. It’s not just a meaningless ritual: the clapperboard has, written on it, information about the scene and take, which is also verbally repeated, then the clapperboard is snapped shut. The camera records the visual part of that, the sound recorder the audio part. Later, it’s a simple question of getting the right audio file for the visual recording (that’s why you record the scene and take numbers), then lining up the sound of the clapperboard snapping to the visual cue of the clapperboard closing.
For a quick video like this, where you only have a couple of scenes, just clapping your hands serves the same purpose. A clap is ideal, because it’s a very short sound and so easy to line up with the visual: it shows up on the waveform in the video editor as an obvious peak.
It helps that my camera still has its own built-in microphones, which are recording the sound at the same time, so in the video editor I can also line up the peak in the audio file with the peak in the audio from the camera — although, depending on how far away the camera is and what other noise it’s picking up (wind, for example), it might not be so easy to find. But the image of me striking my hands together is very easy to find. Line everything up, delete the audio from the camera, and voilà!
Incidentally, you may have noticed that on some shots, the sound is quite bad. I think I must have initially had the sound turned up too high on the recorder, and it was peaking too much: at some point I accidentally knocked the dial to a more sensible level. I should have done some trial runs first to determine the right level, but at least now I know.

Great lesson, Thanks...
ReplyDelete